End-to-End Automated Testing with JavaScript - Protractor
Automation with JavaScript using Protractor and Jasmine BDD frameworks - Step by step.


Protractor is an end-to-end automation test framework for Angular as well as Non-AngularJS applications. Protractor runs tests against our application running in a real browser, interacting with it as a user would. It offers combined end-to-end testing for web applications that are built using AngularJS. It supports both Angular and Non-Angular applications.
Environment Setup:
First, we need to Download and install node.js (.msi version). And then we need to check whether node.js is installed in our system or not. Also, we can check the version by writing (on CMD):
node
node --versionAfter that, we also need to install Java JDK with defining the path of JAVA_HOME. You can watch this video to perform this installation if you want to. Since these installations are not directly related to our article, I am not going to describe the installation steps. In any case, after the installation, we should check whether java is installed or not and also we can check the version by writing:
java
java -version
javac -version(using javac we can compile a java file)
We should also check whether the home environment variable is set perfectly:
echo %JAVA_HOME%(it will show us the path)
The above installation also installs JRE (Java Runtime Environment) automatically.Our next step is to download the IDE. We will use VSCode as our code editor. You can watch this video if you have any confusion downloading VSCode.
Now, we need to install a few things in our system such as npm (node package manager. npm is the default package manager for the JavaScript runtime environment Node.js), protractor, webdriver-manager etc. So, open the CMD and type:
1.npm i package(npm installation)
2.npm install -g protractor(installing protractor framework globally. We can check the version by writing >protractor - -version)
3.webdriver-manager update(updates the selenium webdriver, downloads browser-specific drivers; such as chrome driver.exe).After we run webdriver command, we will notice a location is given. We need to open the location up to protractor and then go to the example file. There, we will notice 2 files. They are:
a)conf.js- - - -> contains all the configurations and frameworks
b)specs.js- - - -> test files are connected here
N.B: We will run thespecs.jsfile throughconf.jswhen we will perform automation.Ok! After that, we need to run:
webdriver-manager start(it starts the selenium server on port: 4444)
Now, we need to go to the location (up to protractor) again and then open the aforementioned example folder in VSCode or CMD and run:
protractor conf.js
We will notice that the first pre-written automated test is running on our machine.Now, let's open windows powershell and open it as administrator. Then type these commands:
1.Set-ExecutionPolicy -Scope CurrentUser -ExecutionPolicy Unrestricted
2.Set-ExecutionPolicy -Scope Process -ExecutionPolicy Bypass
3.ByPass> Set-ExecutionPolicy -Scope Process -ExecutionPolicy Bypass
Remember, every time after running the above codes, we need to press Y. The program will ask us to write it.Finally, a small thing to do: we need to go to the vscode and go to the extension and add javascript and protractor snippets for vscode.
Alhamdulillah. Our initial setup is complete.
Project Starts:
First of all, we need to open a folder where we want to store our project. And then bring the two files conf.js and spec.js in that folder. Also, we have to create another folder named TestSuites. Then, open the project folder in VSCode and open the terminal. Let's type: npm install (it will install npm in the project folder). We also need to type: npm init (it will initialize npm in the project). Then we will see two new files added to the folder. One is package-lock.json and package.json . The difference between package-lock.json and package.json can be found here, if you are interested to learn.
Now, in the VSCode, let's write our configuration code, specs code and open different test case files inside the TestSuites folder and write code according to the project.
For example, here is a demo project’s (daraz) files:
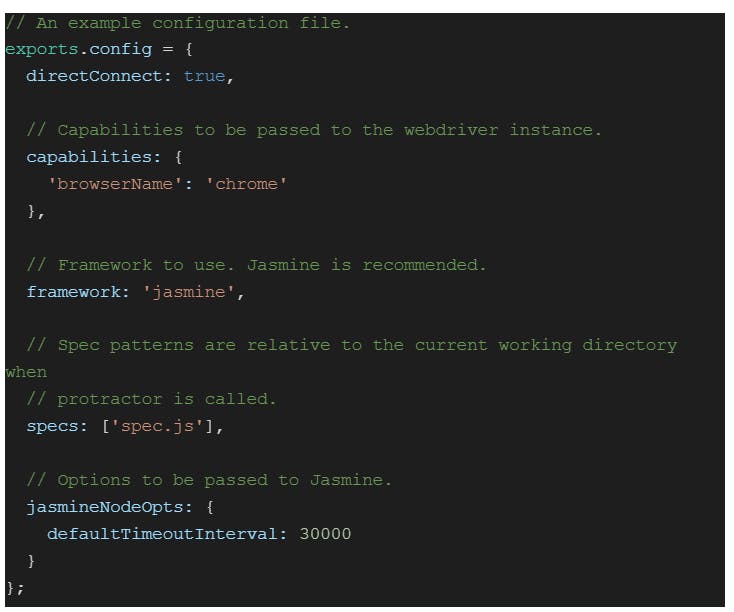
Conf.js file:
Specs.js file:
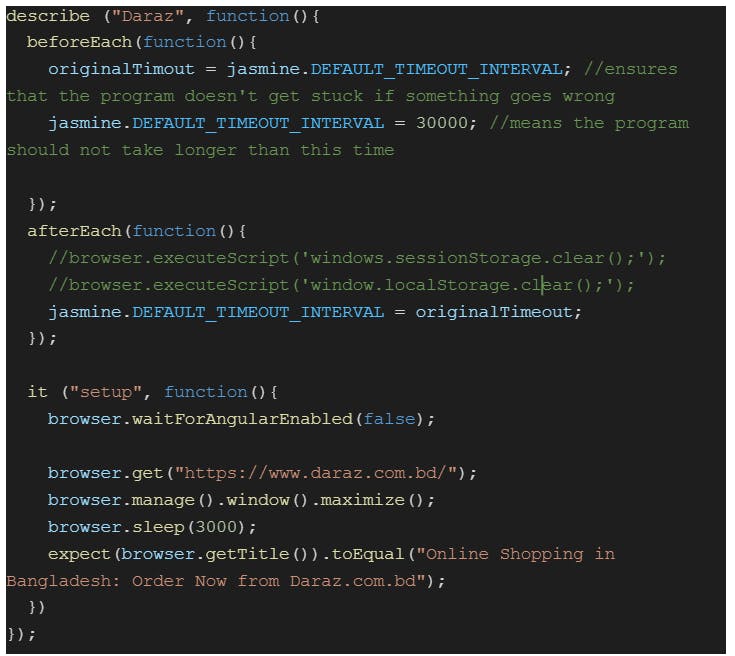
If you look carefully, I have added comments in the code so that it will become easier for you to understand each line of the code.
Ok. Now, we need to open the terminal and write: protractor conf.js . We will notice the program starts to run! Hence, our first test is successful!
Here, let's look at some of the things in the spec.js file:
describe: is the test suite that contains multiple “it” blocks
it: this block contains tests
beforeEach: executes multiple times before executing every “it” block
afterEach: executes multiple times after executing every “it” block
beforeAll: executes one time before executing all “it” blocks
afterAll: executes one time after executing all “it” blocks
These are called the “Building Blocks” of the Jasmine BDD Framework.
Now, we have to write our test cases inside the TestSuite folder. Open VSCode and add test cases inside the TesSuite folder such as: login.js, addProduct.js, checkout.js etc. Every application has lots of features or modules. We need to break them and add test cases for the features or modules. And finally, we need to connect them to run the end-to-end automated test.
Let's write our first test case in the file named login.js inside the TestSuite folder. In this file, we will write code for logging into daraz.

We have created a function named login because we need to export our login function. As a result, we wrote module.exports = new login(); at the end of the code. Now, we need to use this login function in the spec.js file. Let’s implement:

Now, just run the program using the command protractor conf.js in the terminal. We will see that after executing the spec file, the program will also execute our first test case which is login.js. Similarly, we need to add multiple test cases according to the need of our project and run them through the spec.js file. Just don't forget to export and call the function as well as mentioning the path such as let login access = require("./TestSuites/login.js"); at the beginning.
There are some more important things while writing code and identifying elements:
element= finds a single elementelements.all= finds multiple elements
Some angular-specific locators:
ng-model
ng-bind
ng-repeater
ng-controller
ng-options
Some selenium webdriver locators:
id
name
tag name
XPath
ClassName
CSS
linkText
Protractor supports these two types of locators: angular specific and locator inherited from webdriver.
Here is the basic control flow of Automation with JavaScript and Protractor:

Allure Report:
When a test is complete, we need a report of that test. This report will show us the passed and failed tests along with much other information. We will write some code below which will allow the program to generate an HTML report and screenshots. On every run of the automation, the program will remove the previous video and screenshots and generate new videos and screenshots.
First, we need to install jasmine allure reporter on our machine. Go to cmd and write:
npm i jasmine-allure-reporternpm install -g allure-commandline --save-devallure serve ./allure-results
We also need to perform the same installation codes in our project folder. Then we need to implement the allure reporter code in the conf.js file. After the implementation, our conf.js file will look like this:


Finally, we need to run our automation test again. When the test is complete, then we need to write allure serve ./allure-results in the terminal to get the report. The program will then automatically generate the test report.
All of the above things we have seen so far are the installation, setup and run of a basic automated test with a reporter. This is just a start. We need to add more test cases by just following the above example and then complete the full project. Here, I have provided two complete demo projects' videos with allure reporter to make ourselves understand what a full sample work may look like: video 1 and video 2.
The source codes of the two sample projects can be found here: automation demo project 1 and automation demo project 2. Please feel free to download any sample project for learning purpose.
All the best ❤